Filtering Items
Filtering items in "Get items" action
If you don't want to fetch all items from a board, you can retrieve only a subset of items using filters.
Follow these steps to add one or more filters to the "Get items" action:
-
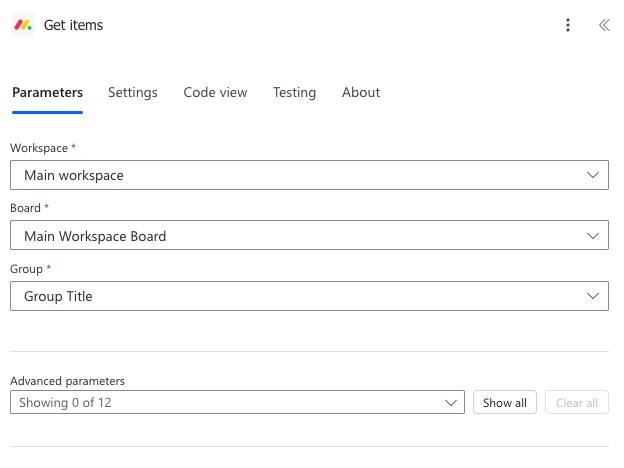
In the "Get items" action, select your workspace, board, and group.
-
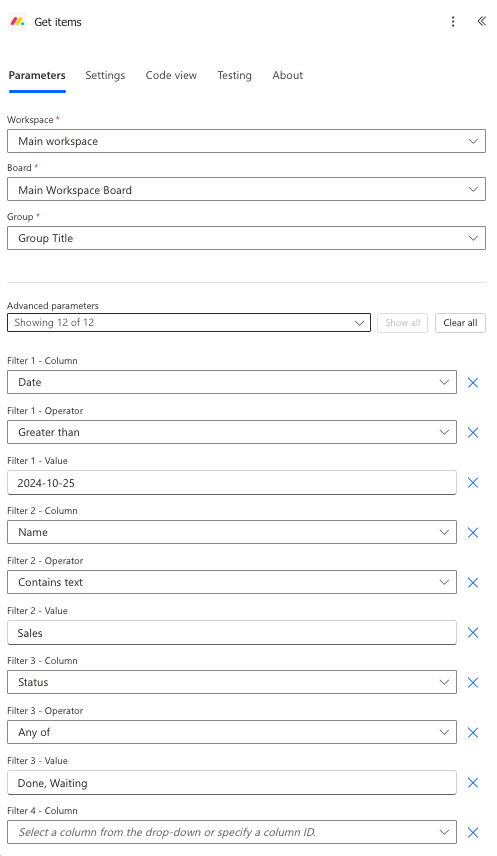
Click the "Show all" button at the bottom of the "Get items" action. This will open up the advanced parameters, which includes the filter fields. Up to four filters are available to use.
-
For each filter, select the column you want to filter on, the operator, and the value. The value can be a static value or dynamic content from a previous action. For example, you can filter on the "Status" column, where the value is "Done". If you no longer want to filter on a specific column, you can clear it out or select
* No Filter *from the dropdown.
Each filter is added as an "AND" condition. For example, if you have two filters, one for the "Status" column and one for the "Person" column, then only items that match both filters will be returned.
Specifying multiple values for a filter
If you want to specify multiple values for a filter, you can do so by separating the values with a comma. For
example, if you want to filter on the "Status" column, with the operator "Any of", where the
value is "Done" or "In Progress", you can specify the value as: Done, In Progress.
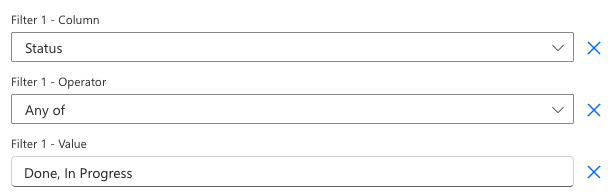
Examples of operators that can take multiple values are "Any of" and "Not any of".
Paginating results
If you have a large number of items (~1000 or more) on your board, the "Get items" action may not return all of them in a single response. It will likely end up returning an error similar to: "The Monday API rate limit was reached (complexity budget exhausted)".
The monday connector uses the monday.com API to communicate with monday.com. To protect monday.com's servers from too much load, monday.com uses rate limiting. If there are many items on a board, the API may return an error when trying to fetch all of them at once using the "Get items" action.
Monday.com recommends using filters to fetch only the necessary items, which can help avoid rate limiting. This is what we recommend as well, but sometimes this isn't possible for every use case.
In this guide, we will show how to use pagination to fetch items in smaller batches (avoiding rate limiting), then combine them into a single array variable which contains all the items. This will allow you to fetch all items from a board without hitting the rate limit.
Pagination flow overview
We will be building the following flow, which will fetch all items from a board in batches of 100 items at a time. It will then add this data to an Excel table.

Pagination flow steps
-
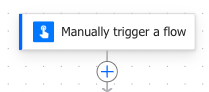
This flow starts with a manual button trigger for simplicity, but you can use whichever trigger you would like.
-
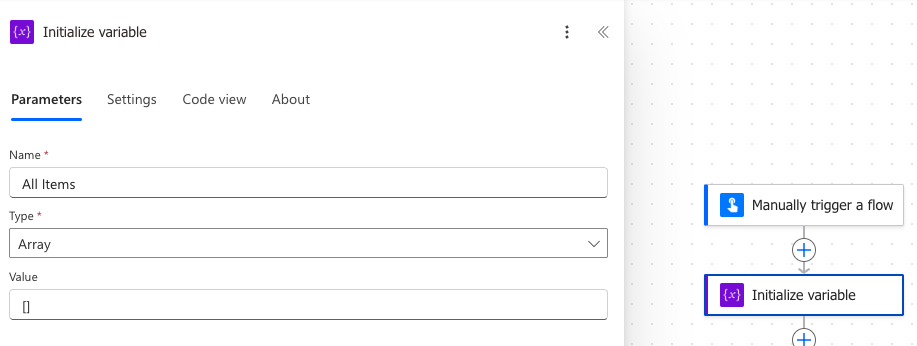
Add an "Initialize variable" action to your flow. This variable will be used to store the items that are fetched from the board. Set the variable name to "All Items", the type to "Array", and the value to
[](an empty array). This will initialize the variable as an empty array.
- Add another "Initialize variable" action to your flow. This variable will be used to store the cursor
for pagination. Set the variable name to "Cursor", the type to "String", and the value to
null.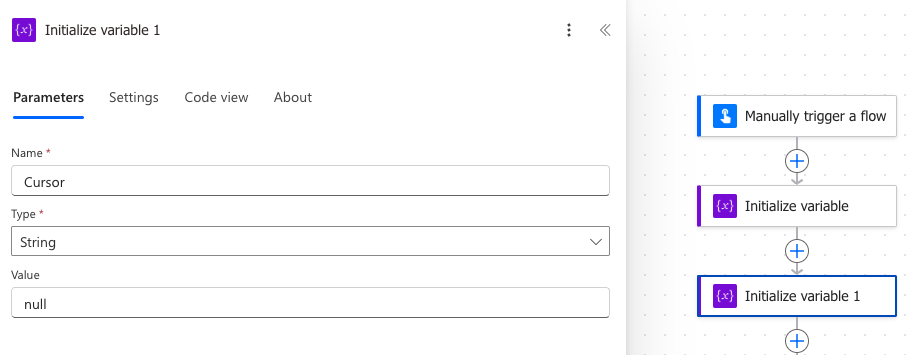
What is a cursor?
A cursor is a pointer that indicates the position of the last item fetched from the board. It is used to keep track of where to start fetching the next batch of items. The cursor is returned in the response of the "Get items" action for each item, and it can be used to fetch the next batch of items.
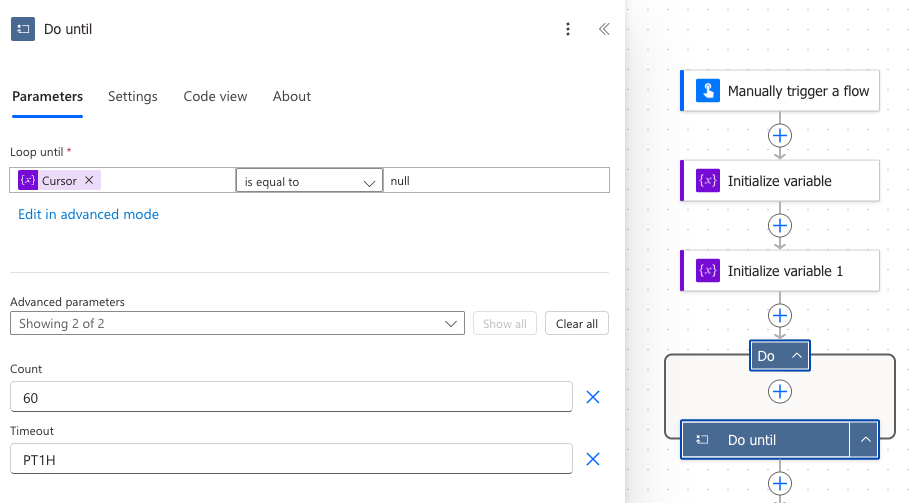
- Add a "Do until" action to your flow. This action will be used to loop until all items are fetched
from the board. For the "Loop until", select the Cursor variable from before, set the operator to
"is equal to", and the value to
null. This means that the loop will continue until the cursor is null, which indicates that there are no more items to fetch. The Count is the maximum number of iterations the loop will run. Set it high enough that you're able to fetch all the items from the board. For example, when fetching 2000 items, make sure it's above 20, since each batch contains 100 items. The Timeout is the maximum time the loop will run. Set it to a high value, such as 1 hour (PT1Hmeans 1 hour). This means that if the loop takes longer than 1 hour, it will stop running.
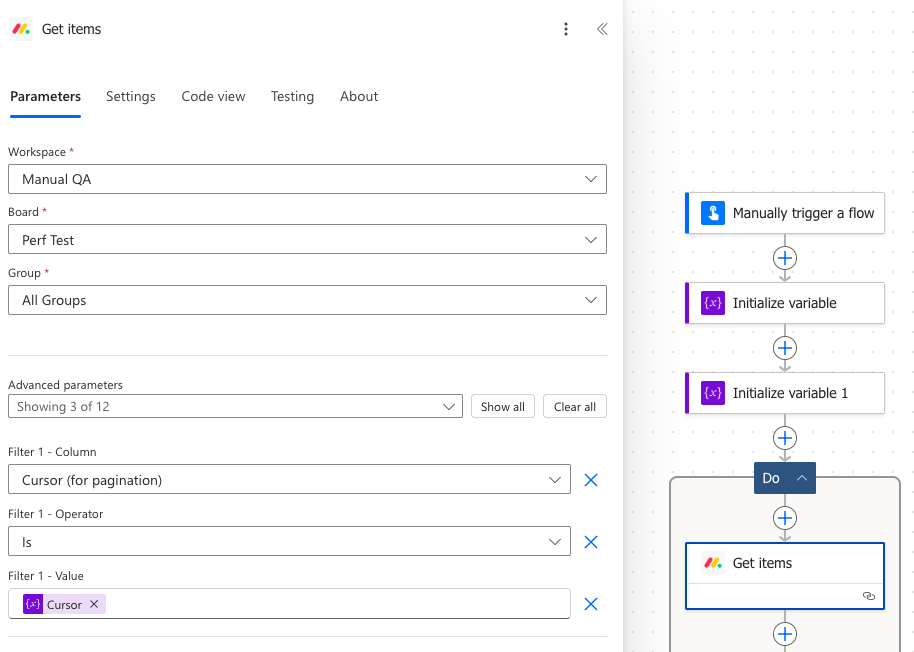
- Inside the "Do until" action, add a "Get items" action. This action will be used to fetch the items from the board. Select your workspace, board, and group. Click the "Show all" button to show the advanced parameters. For the filters, select "Cursor (for pagination)" as the Filter 1 - Column. For the Filter 1 - Operator, select "Is" from the dropdown. For the Filter 1 - Value, select the Cursor variable from the Dynamic content window. This will set the cursor to the value of the Cursor variable. You can also add additional filters if you don't need all items on the board.
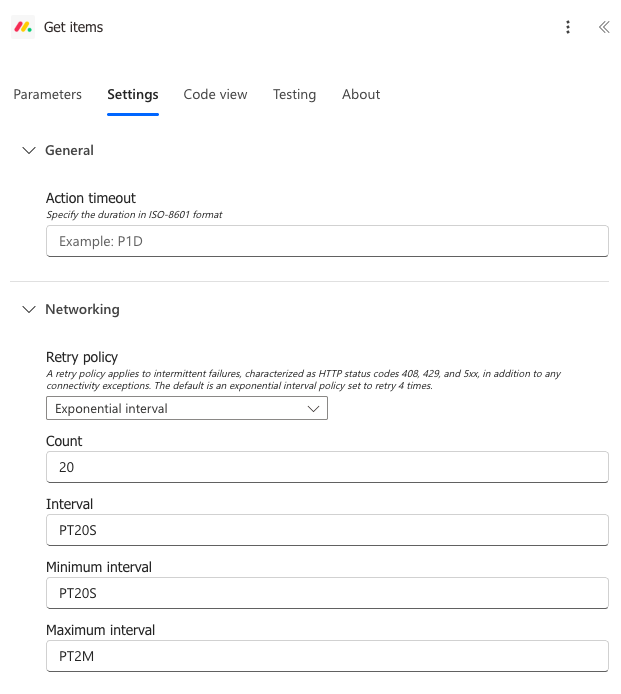
- To ensure the "Get items" action can handle rate limiting errors the monday API may respond with, we
need to specify a retry policy. In the "Get items" action, select the Settings tab. In the "Retry
policy" section, select "Exponential interval" from the dropdown. This will set the retry policy
to exponential backoff, which means that if the action fails, it will wait for a certain amount of time before
retrying. The wait time will increase exponentially with each retry. Specify the "Count", which is how
many times it should retry. Specify the interval, which is the time to wait before retrying. Here, we set the
interval to retry after 20 seconds, using the formula
PT20S. This means that if the action fails, it will wait for 20 seconds before retrying. We also set the "Minimum interval" toPT20S. For the "Maximum interval", we set it toPT2M, which means it will wait a maximum of two minutes to retry.
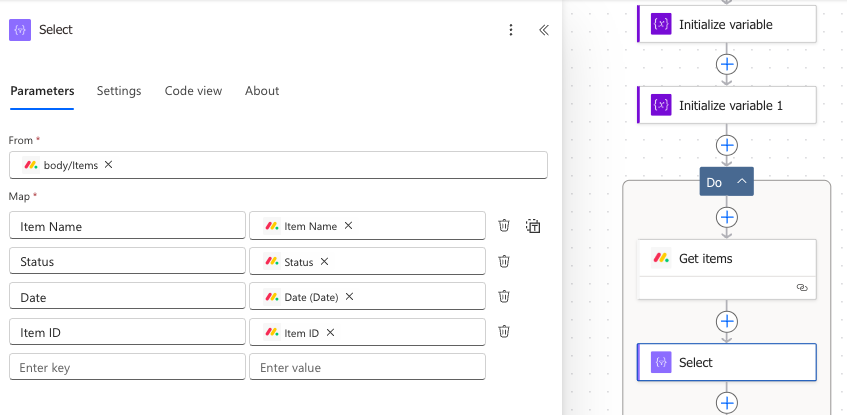
- After the "Get items" action, add a Select action. This action will be used to map the fields from the response of the "Get items" action to the fields in the All Items variable. For the From, select the Body output of the "Get items" action. For the Map, select the fields you want to include in the All Items variable. For example, you can select the "Item Name", "Status", "Date", and "Item ID" fields if these are columns in your board. This will create a new array with only the selected fields. We recommend adding the "Item ID" as one of the fields, even if you won't use it, to ensure that all items are included in the All Items array. Otherwise, any duplicate data will only be added once to the All Items variable. The "Item ID" is the unique identifier for each item on the board.
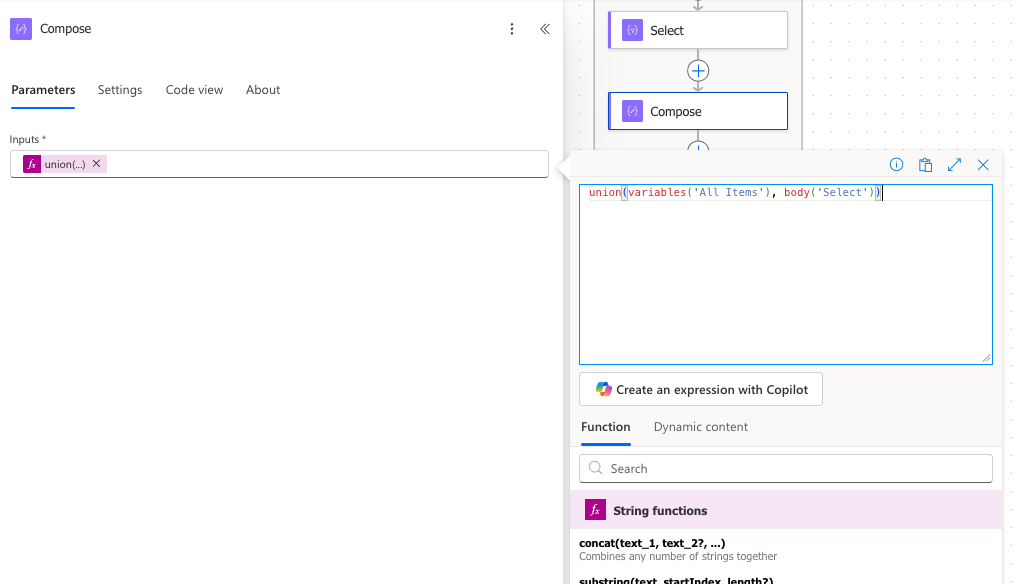
- Add a Compose action. This action will combine the items returned in the response of the Select action with the
items stored in the All Items variable. For the Inputs, add the following formula:
union(variables('All Items'), body('Select')). This will combine the two arrays into one.
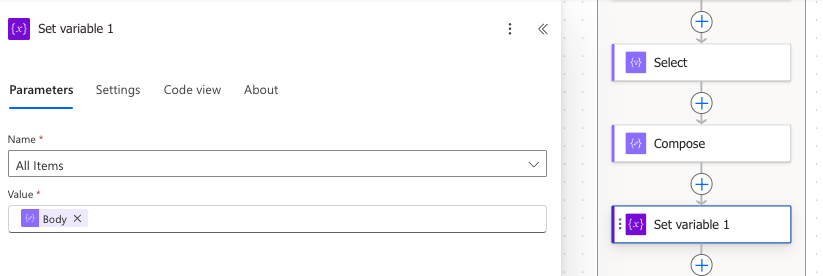
- Add a "Set variable" action. This action will be used to set the value of the All Items variable to the value returned in the response of the "Compose" action. For the name, select the All Items variable. For the value, select the Body output of the "Compose" action.
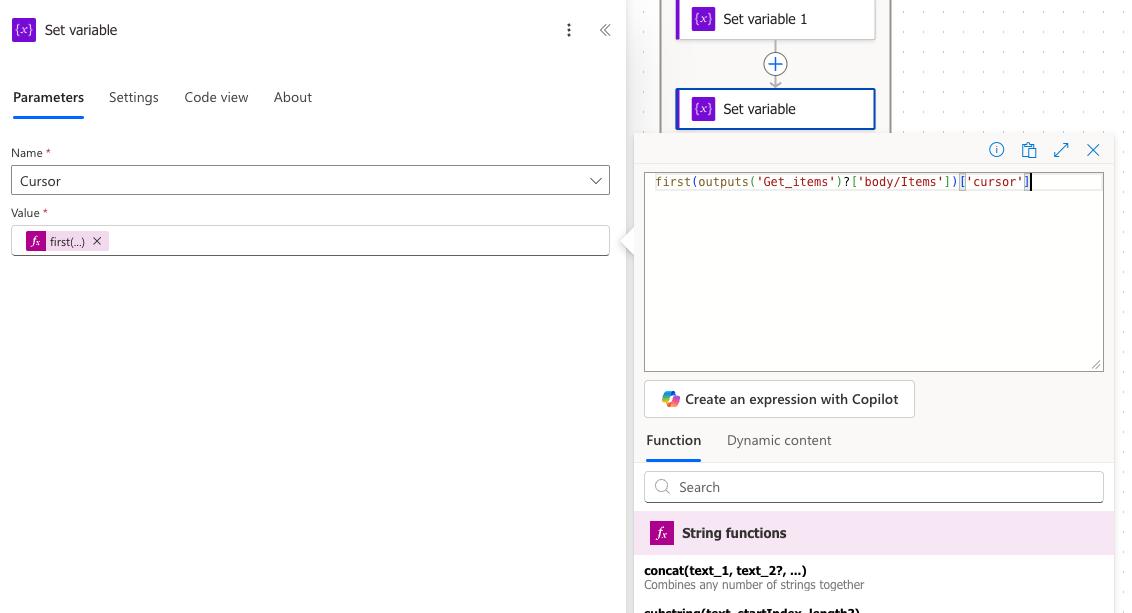
- After the "Set variable" action, add another "Set variable" action. This action will be used
to set the value of the Cursor variable to the cursor value returned in the response of the "Get
items" action. For the name, select the Cursor variable. For the value, add the following formula:
first(outputs('Get_items')?['body/Items'])['cursor']. This will set the value of the cursor variable output by the first item in the response of the "Get items" action.
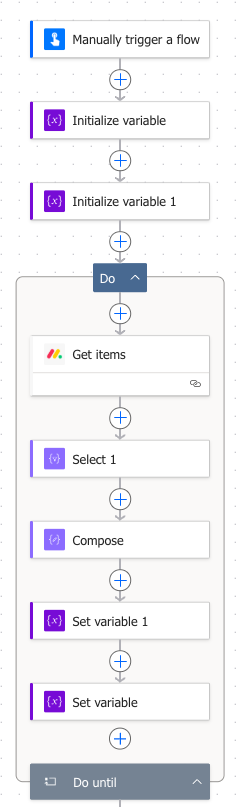
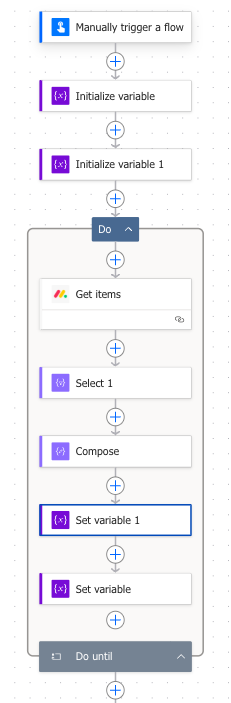
- Your flow should now look like the one in the screenshot below. The All Items array now contains all the selected columns from the items on the board. We still need to make sure that the fields for it are able to be used in the next steps. This will be done in the next steps.
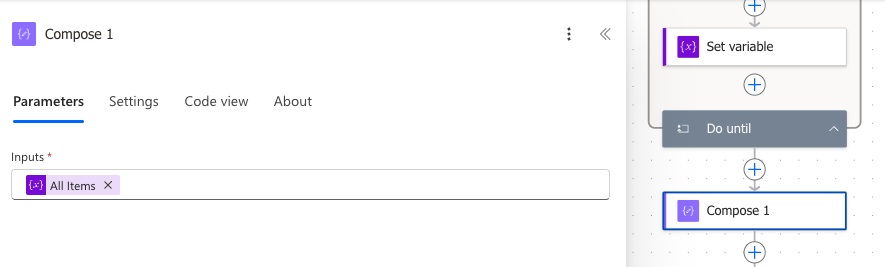
- We need to determine the schema of the All Items variable so we can reference the fields in subsequent actions. We will do this by adding a Compose action after the "Do until" block.
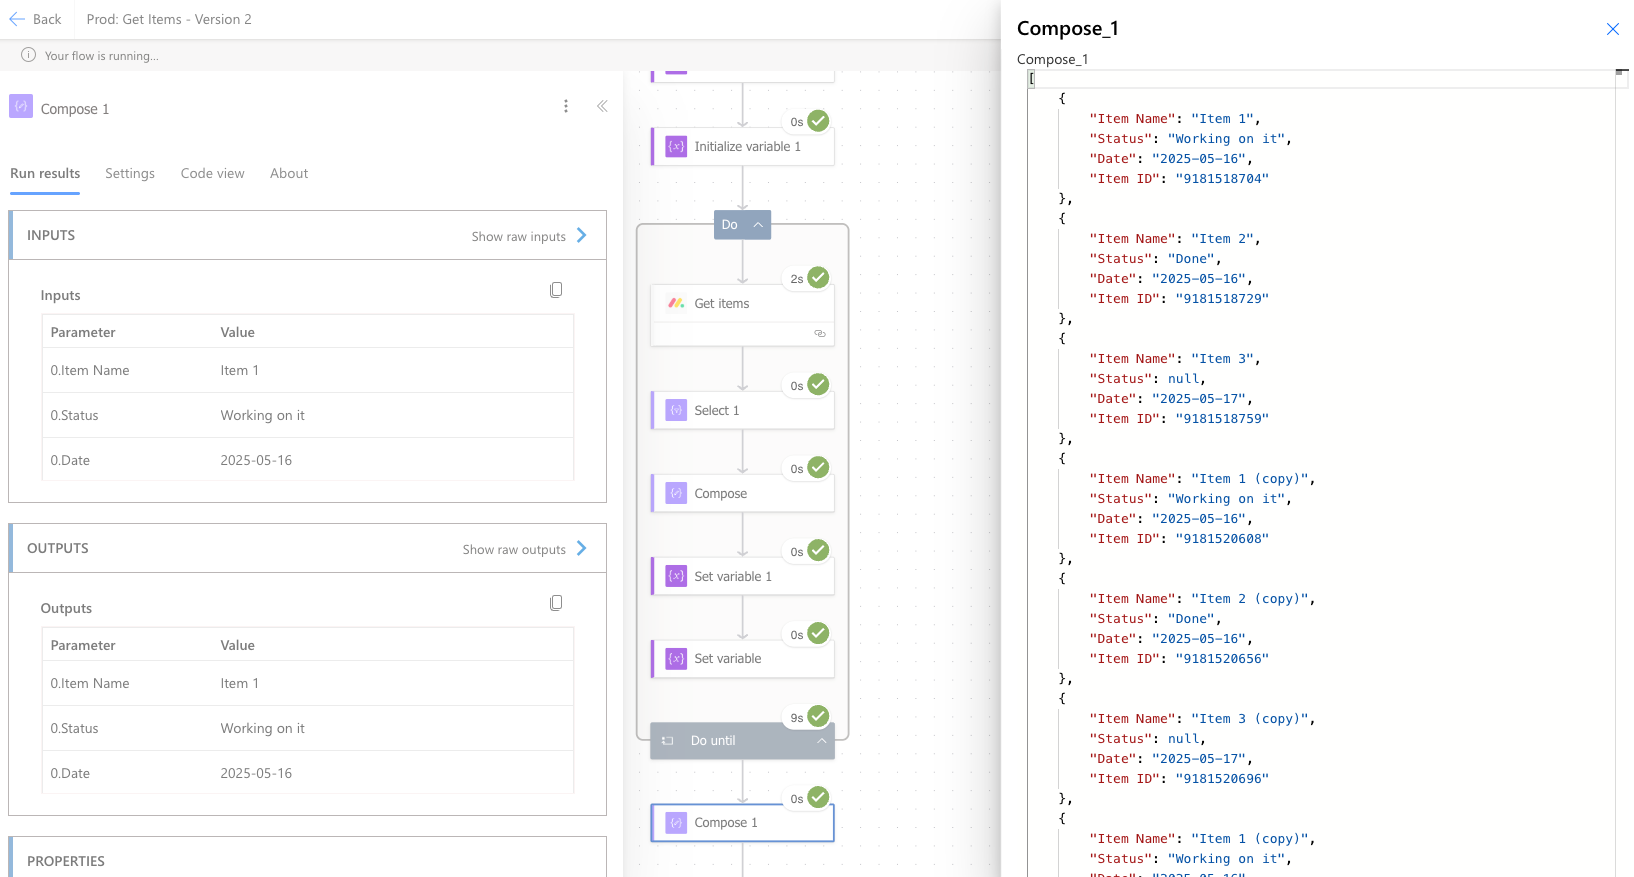
- Save the flow, then run it once by clicking the "Test" button in the top right corner. Select "Manually", then click the "Test" button. Finally, click "Run flow". This will execute the flow and fetch all items from the board. After the flow has run, click on the second compose action ("Compose 1"). In the "Outputs" section, find the output of the Compose action. Click on "Show raw outputs". Select the raw output on the right and copy it. This will be used to generate the schema for the Parse JSON action, which we will add next.
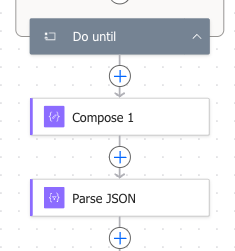
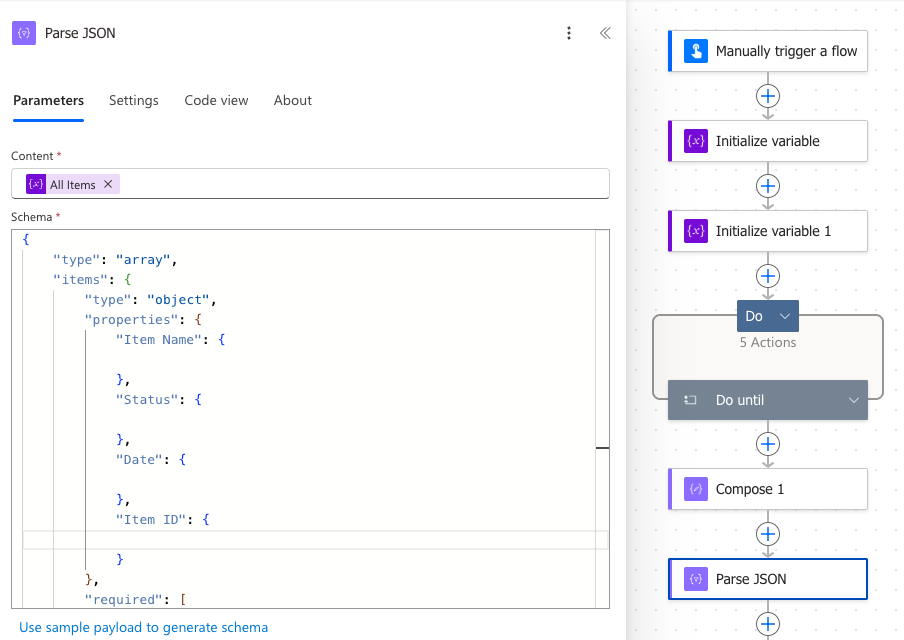
- Go back to editing the flow by clicking the Edit button. Add a "Parse JSON" action at the end of the flow. In the action, at the bottom, click the "Use sample payload to generate schema" link. This will open a popup where you can paste the raw output you copied from the Compose action. Paste the raw output into the popup and click "Done". This will generate the schema for the Parse JSON action.

- For the Content, select the All Items variable. This will parse the All Items variable and make it available for use in the next steps, with the schema we generated.
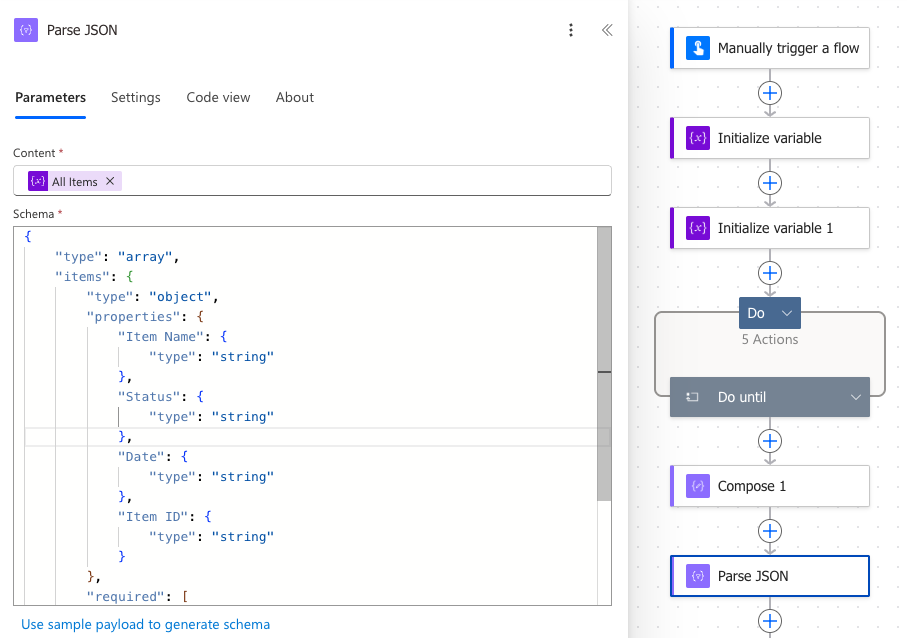
- If there's a chance your columns could be null (for example, if sometimes a column doesn't have any data), then this schema will fail when it encounters items without column data. To fix this, for each relevant property, remove the "type" lines.
- If you would like, you can now delete the last Compose action ("Compose 1"), since it is no longer needed. The Parse JSON action will now parse the All Items variable and make it available for use in the next steps.
- For example, this data can be added to an Excel table. The fields are now available for your action and are output from the "Parse JSON" action.
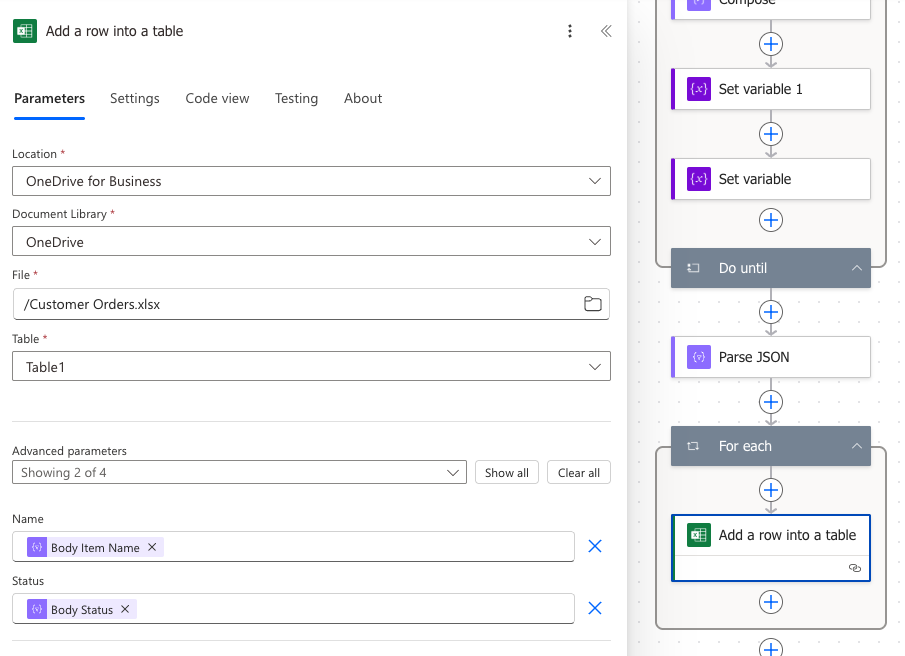
- Below is the final flow that gets all the items from the board in small batches and finally adds them to an Excel table. The flow will also handle rate limiting errors by retrying the "Get items" action with exponential backoff.
Need any additional help that the documentation doesn't cover? Feel free to reach out to our support team at support@plugingenie.com. We are happy to help answer any questions you may have.