Microsoft Forms Example
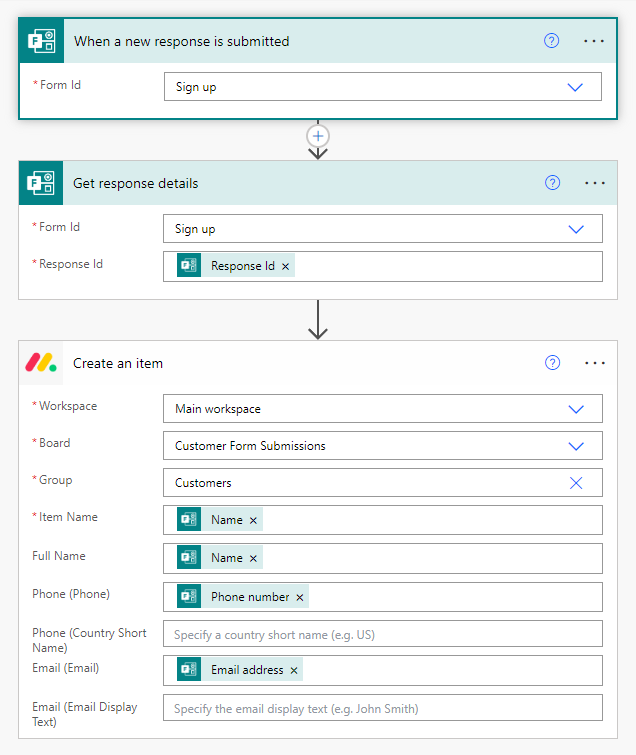
To capture Microsoft Form submissions and automatically add them to a board in monday.com, follow the steps below to get started. After following the steps below, your flow should look similar to the following image:
Instructions
- In Power Automate, click on the "New flow" button, then click on "Automated cloud flow" to create an automated cloud flow.
- Add a name for your flow (e.g. Add form submissions to monday) in the "Flow name" input.
- Type "form" into the search box to find the trigger labeled "When a new response is submitted" (from Microsoft Forms), and click on it to select it.
- Click the "Create" button to create an automated flow, which will take you to the flow editor.
- In the "When a new response is submitted" trigger, pick your form in the dropdown.
- Click the "New Step" button and in the search bar, search for the action "Get response details" (by Microsoft Forms). This action is needed to get the form data. Click on it to select it.
- In the Form Id input, select the same form in the dropdown as you had previously selected in the action above it.
- Click into the "Response Id" input. This will bring up a Dynamic Content window, which will allow you to select the "Response Id" field from the previous "When a new response is submitted" action. Select the "Response Id" dynamic content field.
- Click the "New Step" button and in the search bar, search for the "monday" connector.
- Click on the "monday" connector to select it. This will bring up a variety of monday actions that can be performed after a form submission.
- Scroll down and click on the action "Create an item" to select it. This will add the monday action to your flow.
- Next we will be filtering down the specific workspace/board/group we want the item to be added to. Select a workspace from the Workspace dropdown. Then select a board from the Board dropdown. Then select a group from the Group dropdown. Doing this will automatically populate all the supported fields that are available for your new item.
- Fill out the Item Name. This can be text you add manually or dynamic content from the "Get response details" action.
- Fill out any other desired fields, using the "Get response details" dynamic content. As before, you can get to this by clicking into the field inputs, which brings up a "Dynamic content" popup with the available fields from your form. Doing this, you can map the fields from each Microsoft Form field into the respective monday.com item columns. Be careful that each field is in the correct data format. The format is outlined in the placeholder text of each input field. For example, dates need to be in a specific format for monday to accept them.
- Once you are done, don't forget to click the Save button to save the flow. Once you've done so, any form submissions should show up in your desired monday board/group. If they do not, make sure that you've formatted the field correctly in the format monday expects, as outlined by the placeholder text in each input.
Need any additional help that the documentation doesn't cover? Feel free to reach out to our support team at support@plugingenie.com. We are happy to help answer any questions you may have.